That is busy me buzzing around trying to do tons of little projects or well one really big one...
My dad will be celebrating his 80th birthday in just a few short weeks. My siblings and I are planning a surprise party for him. For some reason, I think because I'm a stay at home mom and everyone thinks I have all the time in the world..., I have been the 'organizer' of this wonderful event. Do people not realize what a pain in the butt it is to drag 2 small children out and about to gather items like the perfect card for the invitations, stamps, finding someone to make the cakes.
Yes, I do make cakes but there is no way I will even attempt to make cakes for roughly 150 people and travel 3 hours in the car with the said 2 small children and a husband and all the for lack of a better word crap that goes along with it.
I haven't touched my sewing machine since I finished my mug rug for the swap and I'm going through with draws. Maybe as soon as I get the invites for the surprise party mailed out I can work on a little project. The hum of the machine is very therapeutic.

Sunday, April 24, 2011


Sunday, April 17, 2011
completed mug rug and cute cakes.
Well now that my person from the Mug Rug Swap has received her mug rug, I can post a picture of it.
This is what I sent. My first paper piecing project ever. I think it turned out pretty good.


Happy sewing and crafting until next time.
This is what I sent. My first paper piecing project ever. I think it turned out pretty good.

Front

Back
And here is what I received.

I got a cute tea towel (you can barely see it in the back there)
Some yummy apple cinnamon black tea, and brewer thing (I don't know the technical term)
and the mug rug with some super cute tea pot fabric and an embroidered tea pot on it.

A close up of the super cute tea pot fabric.
I love it so much.
The rest of my weekend was super busy. I was asked to make the cakes for my friends baby shower on Saturday so that took up a lot of my time and that doesn't include the travelling 2 hours one way to get there.
Here are the cakes I did. I'm no ace of cakes, but I had fun doing it. I apoligize for the pictures, they were taken with my cell phone because I was in such a hurry to leave that my camera was one of the many things I forgot to take with me.


Happy sewing and crafting until next time.
Tuesday, April 12, 2011
The mug rug rage
Mug rugs have become the latest rage in the crafting world. If you do a search for a mug rug you will find an abundance of tutorials, and swaps. I'm sure some people have no clue what a mug rung is, but all in all it is just a fun name for a coaster. They are a bit larger than a coaster but smaller than a place-mat for your table, they range in size from 4"x4" to where your imagination leads you.
I have never joined in any online swaps before so a few weeks ago I took the plunge and signed up over at Sew Happy Geek. This swap has already been paired up but, Jenna will be doing another swap later in the year if you want to get involved.
So far I have made this simple project way more difficult than it should ever be. I have emailed back and forth with my partner on what colors they like and so forth, but I still managed to stress over finding that perfect pattern. I'm hoping she likes what I decided on, if not, well I guess she can put it under the dog's water bowl to catch the drips. :)
I finally picked a pattern you could say, and have made my first attempt at paper/foundation piecing. It wasn't nearly as hard as I thought it would be once I figured out how to do that first seam. I decided a few blocks were fun to do, but I don't think I would want to do a whole quilt like that. The pattern I decided on can be found here.
Now If I arranged the pattern the way it is shown here, then my finished block would look something like this only in different colors.
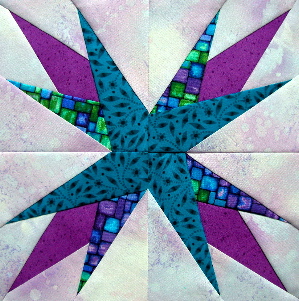
I think the colors the person used when making this pictured block looks like something straight from the late 80's to mid 90's, and well it is giving me some flashbacks of my high school years and I want to run screaming.
Now I may or may not have made my block to have the same funky star appearance. I think by setting 3 of the 4 blocks on point would make some very cool and funky looking tulips, then by leaving the final block blank and appliquéd some green stems and leaves on would be a great finishing touch. But again, I may or may not have done that.
Once I know my person has received their new rug mug I will post a picture, and will also include a picture of the one I received in return. Now I need to get to work on this project and add some boarders quilt it and get bound so I can get it in the mail.
I have never joined in any online swaps before so a few weeks ago I took the plunge and signed up over at Sew Happy Geek. This swap has already been paired up but, Jenna will be doing another swap later in the year if you want to get involved.
So far I have made this simple project way more difficult than it should ever be. I have emailed back and forth with my partner on what colors they like and so forth, but I still managed to stress over finding that perfect pattern. I'm hoping she likes what I decided on, if not, well I guess she can put it under the dog's water bowl to catch the drips. :)
I finally picked a pattern you could say, and have made my first attempt at paper/foundation piecing. It wasn't nearly as hard as I thought it would be once I figured out how to do that first seam. I decided a few blocks were fun to do, but I don't think I would want to do a whole quilt like that. The pattern I decided on can be found here.
Now If I arranged the pattern the way it is shown here, then my finished block would look something like this only in different colors.
I think the colors the person used when making this pictured block looks like something straight from the late 80's to mid 90's, and well it is giving me some flashbacks of my high school years and I want to run screaming.
Now I may or may not have made my block to have the same funky star appearance. I think by setting 3 of the 4 blocks on point would make some very cool and funky looking tulips, then by leaving the final block blank and appliquéd some green stems and leaves on would be a great finishing touch. But again, I may or may not have done that.
Once I know my person has received their new rug mug I will post a picture, and will also include a picture of the one I received in return. Now I need to get to work on this project and add some boarders quilt it and get bound so I can get it in the mail.
Wednesday, April 6, 2011
Move over Hostess
Today I am going to show you how to make your own chocolaty goodness to impress your friends with. If you are like me you always struggle to make a decision of what to take to those pot luck dinners, family BBQ's and so forth. Well struggle no more...
I know you've all had them at one point in your life, those wonderful cupcakes with the cream filling in the centers and the swirly white line across the top.
For these cup cakes you will need.
A boxed chocolate cake mix. Your favorite brand will do. I like to use Duncan Hines Chocolate Fudge or Dark Chocolate cake mix. I snag them up when my local grocery has them 10 for $10.
Everything you need to make the cake according to the package directions (usually 3 eggs, 1/2 cup oil, and water)
Cupcake liners, any kind. I just borrowed this picture from a google search because it was bright and cheery.
 Make the cupcakes according to the directions on the box. Once they are done baking immediately remove from pan onto a wire cooling rack so the bottoms don't get soggy.
Once they are completely cooled it is time to make the filling. Sorry I don't have pictures of this part but it is easy peasy.
For the filling part you will need.

A cake decorating tool with a medium sized opening. I use the wilton #32 star tip because it is the largest I own, any tip with an opening that sized will do. Attach this tip to a pastry or icing bag securely.
This is my basic butter cream frosting recipe.
In a medium/large sized mixing bowl cream together 2 sticks butter/margarine, 1/2 cup crisco or other brand solid shortening with an electric mixer until smooth.
Then add 1/4 cup water and 1/2 teaspoon Vanilla blend in until mixture is smooth.
Next Gradually add in 4 cups powdered sugar, blending until smooth after each addition. If the mixture is too thick you may add milk or water a little bit at a time (no more than a tablespoon at a time) to thin it out a little, You need to be able to squeeze it through your icing tip
 To fill your cupcakes, insert you icing tip completely into the top of the cupcake.
 Then squeeze the filling into the cup cake gradually pulling the tip out as you squeeze. The top of the cupcake will start to crack when it is full.
Keep repeating this process until all the cupcakes are filled.

Now it is time to hide the little secret that awaits the lucky person who unsuspectingly picks up one of these fabulous cupcakes. For that you will need....A can of chocolate frosting, again your favorite kind. I got what was on sale at the time.

 I like to give my frosting a good stir in the can so it will spread nicer and for that I just use a table knife or whatever I grab to spread the icing with. Once you have done that get a tablespoon sized glob and put over the center of the cupcake where I filled it and then turn the cupcake with one hand while smoothing the icing out with the knife that is in the other. You may need to put more or less icing on each cupcake depending on your taste. One can of frosting will do 24 cupcakes and I usually have some of it and the filling left over.
And there you have it. Chocolaty goodness with a surprise in the middle. ENJOY!

Subscribe to:
Posts (Atom)
